
ETDPROG PROGRAM README WEB PAGE
Latest Update: June 7, 2010
Etdprog = Earthquake and Tornado Data evaluation computer PROGram
What The Etdprog Program Does
A Brief Summary Of How The Program Works
Requirements For Running The Program
Getting The Program Running On Your Computer
Program Removal
The Program's Different Run Modes
Processing Datatest.dat File Data
Datatest.dat Top Line Codes For Different Tests
WHAT THE ETDPROG EARTHQUAKE FORECASTING COMPUTER PROGRAM DOES
The Etdprog computer program was created for three purposes:
Earthquake Forecasting Using Multiple Groups Of Electromagnetic Signals
That Have Been Averaged Together
(This mode is presently deactivated
while some changes are being made to the source code)
Earthquake Forecasting Using Individual Electromagnetic Signals
Or A Single Group Of Signals
That Have Been Averaged Together
Earthquake Triggering And Tornado Formation Research
The program enables its users to average together electromagnetic (EM) pulse signals detected during time windows such as three months and then compare those data with past earthquakes. When good matches are observed between the signals and earthquakes, that can serve as an indicator that an expected earthquake could be about to occur near where one of the matching earthquakes occurred.
Data from multiple time windows offset from one another by periods of time such as ten days can be displayed. And changes in the peak heights of chart lines associated with the different time windows can indicate that an expected earthquake is getting closer.
Earthquake Forecasting Using Individual Electromagnetic Signals
The program enables its users to compare individual EM signals with past earthquakes. In some cases, the location of one or more of the earthquakes that match the signal or signals will be the location where an approaching earthquake responsible for the signals will occur.
Earthquake Triggering And Tornado Formation Research
The program enables its users to compare two or more past earthquakes with one another. When matches are observed it can indicate that the earthquakes were triggered by similar forces. Those types of data might also be helpful in developing a better understanding of why some tornados form and how some of them might be forecast.
A BRIEF SUMMARY OF HOW THE PROGRAM WORKS
The program processes data in two steps.
Step 1 involves generating information regarding things such as the location of the sun and moon in the sky when an EM signal was detected or when an earthquake occurred.
Step 2 involves using probability equations to compare those types of data with similar data for the more than 50,000 earthquakes in the Dataeqem.dat file, and then displaying the results with Reports, Charts, and Maps.
Data can be manually entered once the program is running. And the program will automatically process them using both of those steps. Or, the program can be instructed to read and process data stored in the Equakes.dat or Datatest.dat files. EM signal and earthquake data for the program to process with Step 1 are in Equakes.dat. EM signal and earthquake data for the program to process with Step 2 are stored in Datatest.dat.
With the present program, EM signal detection and earthquake occurrence times must be between the beginning of January 1, 1990 and the end of December 31, 2009.
REQUIREMENTS FOR RUNNING THE PROGRAM
The present version of the Etdprog.exe program is designed to run on a standard PC type computer using Windows Vista, XP, 2000, or NT. Future versions of the program should run on other computers such as Macs and with operating systems such as Unix and Linux.
There are no specific memory or processing speed requirements. However, the larger the memory the computer has and the more powerful its processor is, the faster the program will run. Four gigabytes of memory are ideal. Differences in program run times can be dramatic when there are so many data being processed at one time that Windows has to begin using its virtual memory.
The program can be stored on and run from any media that allow standard reads and writes. That would include computer hard drives, external hard drives, and even flash drives. It will not run on a write only CD or DVD. And it will probably not run very well on a rewritable CD or DVD.
The original program and support files require about 50 megabytes of disk space. Over time as the program runs it creates and stores new files in the Filesq and Filese directories. Those files enable the program to run much faster. But they use quite a bit of additional disk space. They can be erased at any time. And the program will recreate them if and when they are needed.
GETTING THE PROGRAM RUNNING ON YOUR COMPUTER
If a printed copy of this ReadMe file is generated it can make it easier to follow the instructions.
The Etdprog computer “Program” consists of a main Forecast directory within which there are about a half dozen subdirectories, several computer programs, and dozens of support files. All of those files etc. have been compressed into an Etdprog.zip file for faster downloads and to make it easier to circulate copies of the program by E-mail.
For a brief summary of what needs to be done:
The Etdprog.zip file needs to be downloaded. Then the Forecast directory and all of its files have to be extracted from the zip file and stored at some location on a computer, external hard drive, or flash drive. Finally, the “Start” shortcut file in the Forecast directory might need to be modified depending on where the Forecast directory is stored. When the program starts running for the first time it will ask the user for information such as the UTC correction time that is needed for converting local AM and PM times to UTC.
STEP 1 Download, Extract, And Store The Program On Your Computer
A. Store the Etdprog.zip file somewhere on your computer, on an external hard drive, on a CD, or on a flash drive.
B. Determine where on your computer you want to store the Forecast directory when the main program is running.
C:\ Forecast\ is probably the easiest location to use.
C. Double click on or open the Etdprog.zip file so that you can see the Forecast directory. Or simply extract it from the zip file.
D. Copy or extract the entire Forecast directory in the zip file and store it at the location on your computer, external disk drive, or flash drive where you want the program to run. If the C:\ drive was chosen you would then see a directory listing such as: C:\Forecast\
The Forecast directory will contain about a half dozen subdirectories, several computer programs, and dozens of files.
STEP 2 - Customize The START Shortcut File That Will Be Used To Run The Program
A. Access the Forecast directory. If it has been stored as C:\Forecast\ then you can copy the “Start” startup shortcut or link file to whatever location you wish. And it can be used without any modifications to start the Etdprog program running. Make certain that a copy of the Start file remains in the Forecast directory. Several of the program options need to occasionally use it.
B. If the Forecast\ directory was stored at some location other than as C:\Forecast\, two of the addresses in the Start file will need to be changed.
C. To change them, right click on the Start file. Select the Properties tab. And in the “Target” box enter the full address for the Etdprog.exe program.
For example: C:\Earthquake\Forecast\Etdprog.exe
In the “Start In” box enter the full address for the Forecast directory.
For example: C:\Earthquake\Forecast\
Once those address adjustments are made the Start startup file can be copied to any location on the computer. And when it is double clicked (or single clicked if your computer is set appropriately), the Etdprog.exe computer program should start running. Make certain that a copy of the Start file is left in the Forecast directory. The Etdprog.exe program occasionally needs to use it.
D. Expert Windows users will also be able to make other adjustments to the Start file to change the screen color and size and location of the window etc. when the program runs.
E. A new Windows shortcut file can also be created for the program. But the screen colors and window size might then need to be adjusted in that file.
F. The program can also be started by simply double clicking on Etdprog.exe. Or, a Windows batch file (.bat) can be used to start it. It can be started by another computer program. Or the Windows Run command line can be used to start it. However, with those options there will be no automatic control of the screen background color and screen size. The program’s screen color will probably be black. And if the Start file in the Forecast directory contains the wrong addresses, a few of the Etdprog.exe program options will not work.
G. The program will pause at different times while it is performing calculations or loading data files. If you wish to see what it is doing at those times then press the J key (upper or lower case) while the program is in the startup delay time. And it will begin generating a running log of what steps it is taking. It will also begin storing a program activity log in the Filesw\Debug.dat file.
H. When times are entered manually while the program is in the PROCESS TIMES mode or automatically when it is in the PROCESS EQUAKES mode, data lines for those times are created and stored in the Datalins.dat file. If the “b” key when Charts and Maps are displayed, or when the “b” key plus Enter are pressed when the CHART/MAP/REPORT SCREEN and TIME ENTRY SCREEN screens are displayed, that Datalins.dat file will display along with the Datatest.dat file. The new lines in Datalins.dat can then be copied to the Datatest.dat file.
When the program is in the CHART/MAP/REPORT mode it reads the data to be processed from the Datatest.dat file. Active data lines need to be between the words “start” and “end” in that file. If the new time data lines are not copied from Datalins.dat to Datatest.dat then they will be automatically erased from Datalins.dat the next time the program runs.
I. When Charts and Maps are displayed, press the Page Down key or the W key to activate the scroll feature. Then use the Up and Down arrow keys to scroll through the Charts and Maps.
J. To move the yellow vertical longitude line cursor to the right or left use the Right or Left arrow keys at any time to activate that option. The size of the left or right step can be increased by pressing the Up arrow key one or more times. Press the Down arrow key to go back to a 1 longitude degree step. You then need to press Page Down or W again to reactivate the scroll feature. Press the number 4 key to display four or five yellow vertical longitude lines. And press the number 1 or 4 keys to activate or deactivate those lines.
STEP 3 - Program Startup Options
The remaining Step 3 information is optional reading. The program will display this information when it starts running.
A. Once the Forecast directory has been stored at the desired location and any necessary modifications have been made to the Start file, the program user can simply double click on the Start file to get the program running.
The first time that it runs, or when the Forecast\ directory has been totally replaced with an updated version, or when the "r" key is pressed right after it starts, the program will ask for the certain types of information such as the local AM and PM to UTC correction time in hours. The user can then follow the instructions on the different screens and access the help files for additional information. Detailed explanations regarding the startup options are also listed here.
B. Some of the program default settings are displayed. And the program user can press the Escape key to accept them and continue running, press the "x" key to exit the program, or press the Enter key to modify the settings.
C. The program will first ask for the UTC correction time in hours. It is used to convert local AM and PM times to UTC.
If the program user is located west of Greenwich (0 E longitude) and east of the International Date line (180 E longitude), somewhere in the United States for example, then the correction time will be in the range 0 to 11.
If the program user is located east of Greenwich (0 E longitude) and west of the International Date line (180 E longitude), somewhere in Japan for example, then the correction time will be in the range -1 to -12.
If you do not know what your UTC correction time is then you might be able to determine that by sending yourself an E-mail letter. If you examine the “properties” of the letter that returns, somewhere in the header section there might be a UTC correction time number for your area.
0 can also be entered for a UTC correction time. But the user must then use UTC values for EM signal times when they are entered. Earthquake times in the Equakes.dat file are automatically processed as UTC times.
When you change from Standard to Daylight Saving Time, or from Daylight Saving Time back to Standard Time you will need to adjust the UTC correction time one hour forward or back.
For several examples of UTC correction times, for United States East Coast residents the UTC correction would be 5 hours for Standard Time and 4 hours for Daylight Saving Time. For U.S. West Coast residents the correction would be 8 hours for Standard Time and 7 hours for Daylight Saving Time.
D. Next, the program asks for a startup delay time in seconds. That time delay allows the user to choose which mode the program should start with for that particular run. If nothing is selected then it will start in the default mode after that delay time. Any number of seconds can be entered. Experienced program users will probably want to work with a delay time of five seconds or less as they will already know what options are available. To temporarily freeze the countdown time press the Space Bar.
E. Next it asks for the default operating mode. The program can be set to automatically begin displaying Charts and Maps, or process EM signal times, or process the earthquake and EM signal times in the Equakes.dat file.
F. The program then asks for the Operating System type. It can be Windows Vista, XP, 2000, or NT.
G. Finally, the program displays a Gnuplot graphics screen. And it asks the user to adjust the screen size to the preferred size. The user can drag the margins to the correct size or click on the Full Screen box at the top right corner of the screen. The user then needs to right click somewhere on the screen and left click on the Update line. Then the Escape key is pressed to continue. From then on when Charts and Maps are displayed that screen size will be used. It can be changed whenever a Chart or Map is displayed.
Information regarding the screen size is stored by the Gnuplot graphics program in a text file named wgnuplot.ini in an application directory somewhere on the computer. It can be located with a search or by right clicking on a Chart or Map screen. It will be the file address associated with the Update option.
STEP 4 - Optional Filesh\Startup.dat And Filesh\Startup-default.dat File Modifications.
A. Experienced program users can make the following additional modifications to the Filesh\Startup.dat and/or Filesh\Startup-default.dat files.
B. When the program runs for the first time or when the Forecast directory has been completely replaced it loads the Startup-default.dat file, makes the necessary adjustments to the data, and then stores the new values as the Startup.dat file. After that the Startup.dat file data are used when the program runs.
C. Before modifications are made to the Startup-default.dat file a backup copy should probably be created in case something in the program stops running after the change is made.
D. Open the Filesh\Startup.dat and/or Filesh\Startup-default.dat file using any word processor program. After changes are made, resave it as a regular text file without formatting.
There has to be a single space between the colon sign ( : ) on each line and the rest of the line.
Lines beginning with a pound or number sign (#) are ignored.
E. Autostart Mode: PROCESS TIMES
The program default is set to that it automatically start in the PROCESS TIMES mode after the startup delay time. If PROCESS TIMES is replaced on that line with CHART/MAP/REPORT or PROCESS EQUAKES then the program will automatically start in one of those modes.
F. UTC Correction Time In Hours The default value is 0 hours.
E. Startup Delay In Seconds The default value is 12 seconds.
G. Operating System At the present time the Etdprog program does not make any decisions based on what operating system is running on the user’s computer. The information on that line simply displays when the program runs.
H. Key Message: Active Keys = 1 4 a b d i j k n o p s r u v w y h=help x=quit End Page Down
The program user can store any information on that line. It displays at the bottom of the Chart and Map screens and makes it easier to remember which keys are active.
I. Other settings in the Startup.dat file can be adjusted as desired to modify screen color, the location of different data on the display screens, and to specify which keys will be used to activate the various graphics screen commands. In early versions of the Etdprog program some of those options might not be active.
STEP 5 - Program Operation
The program will pause at different times while it is performing calculations or loading data files. If you wish to see what it is doing at those times then press the J key (upper or lower case) while the program is in the startup delay time. And it will begin generating a running log of what steps it is taking. It will also begin storing a program activity log in the Filesw\Debug.dat file.
After any of the data entry or Chart or Map screens are displayed, help files can be displayed for additional information regarding program commands etc. All of those files can be modified by the program user so that they display whatever information is desired.
The program user can also double click on any of the files in the Filesh directory to display them using a word processor program. The larger ones contain graphics and are Windows Wordpad files. For the smaller ones, Windows Notepad can be used.
There are two simple steps for removing the program from your computer. It does not install itself in the Windows system or change the registry files.
1. Delete the entire Forecast directory with all of its subdirectories and files etc.
2. The Gnuplot graphics program creates two text files that are normally stored in one of the application directories. They contain information regarding the graphics screen size etc. Their names are wgnuplot.ini and gnuplot_history. Program users can do a search for them. Or when the graphics program is running, they can right click anywhere on the screen. The location of the programs will be in the bottom Update line. Once they are located they can be deleted.
After those two steps are competed there should be nothing left of the program in the user's computer.
THE PROGRAM’S DIFFERENT RUN MODES
EM signal time data can be entered manually. Or EM signal time and earthquake time data can be automatically entered using the Datatest.dat and Equakes.dat files.
When the program starts running, the following green background Startup options screen will appear and remain visible for the number of seconds specified in the Filesh\Startup.dat data file. If more time is desired for the Startup screen display, the appropriate number can be changed in that file.
If the Spacebar is pressed the screen will remain visible until some other key is pressed.
While the Startup screen is displayed, any of several run modes can be selected by pressing the appropriate key.
AUTOSTART Mode - If no key is pressed then at the end of the delay time the program will begin running in the default mode listed in the line on the bottom of the screen. If the Enter key is pressed it will immediately begin running in that mode.
PAUSE Mode - If the Space Bar is pressed during the Startup Delay Time the screen will temporarily freeze. That enables the user to study the screen options. Pressing the Space Bar again or any of the other active keys will start the program running again.
DEBUG MODE - Pressing “j” will direct the program to store a detailed progress report log in the Filesw\Debug.dat file. That file is cleared each time the program starts. Additional information will also be displayed on the program screens as it runs.
CHART/MAP/REPORT Mode - Pressing "c" will cause the program to immediately begin running in the CHART/MAP/REPORT mode. It will start processing the EM signal and earthquake lines in the Datatest.dat file.
PROCESS EQUAKES Mode - Pressing "f" will cause the program to immediately begin running in the PROCESS EQUAKES mode. It will start processing the EM signal and earthquake lines in the Equakes.dat file.
PROCESS TIMES Mode - Pressing "t" will cause the program to immediately begin running in the PROCESS TIMES mode. It will allow the user to manually enter EM signal or earthquake times.
RESET STARTUP DEFAULT VALUES Mode - Pressing "r" will cause the program to display the Reset Startup Default Values screen that lists options along with the startup default values. The program user can then press Escape to accept the default values and resume running, press "x" to exit the program, or press the Enter key to begin resetting the default values. If any other key is pressed the program will let the program user reset the default values, but the Backspace key will first have to be pressed to get rid of an extra character on the first option selection line.
OPERATING SYSTEM LEVEL Mode - Pressing the "o" key will cause the program to enter the Windows' operating system level mode. And the program will reload and start running in that mode. The normal green colored screens will have a black background. This mode is helpful for error detection. If the program stops running for some reason, information regarding the reason will be displayed on the screen and remain there until the user instructs the sceen to exit. With the normal Windows operation mode that error information is displayed. But it immediately disappears.
PROCESSING DATATEST.DAT FILE DATA
The program can generate and display earthquake Report and/or graphics Chart and Map data using manually entered EM signal time data or data lines in the Datatest.dat file.
The data lines in the Datatest.dat file contain information regarding things such as the location of the moon in the sky at the time when an EM signal was detected or the time when the earthquake referred to in the data line occurred. The program looks at specific locations in each data line for certain types of information. And if the format of the line is not exactly correct an error will occur when the line is processed.
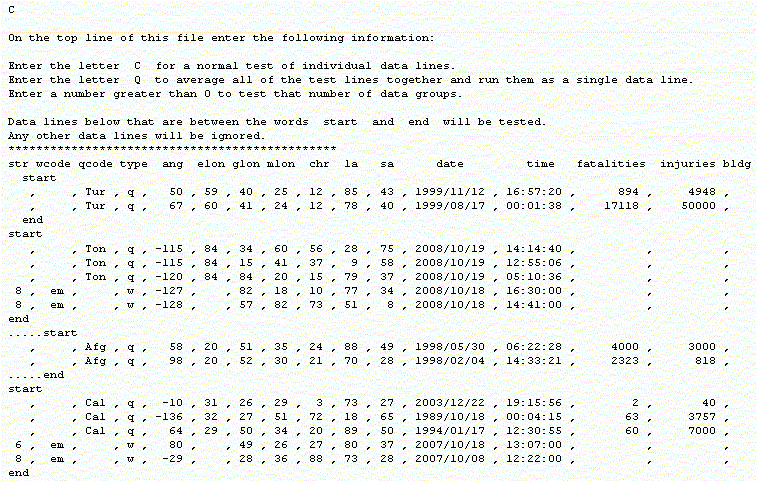
First, the program reads the top line in the file to get information on the type of test it needs to run. With the above Datatest.dat file it would extract the letter "C" from the file.
Second, it reads the first group of data lines located between the word “start” and the word “end” for the data line set where those words are on the far left side of the line. All of the other lines in the file are ignored. In the above example the following data line set that includes the Tonga earthquake data are active.

The data line sets that contains the Turkey and Afghanistan earthquake data will be ignored because the words start and end for those data line sets are several spaces or characters away from the left side of the line. The data line set that contains the California earthquakes will be ignored because there is another correctly formatted data line set above it.
This selectivity feature makes it possible to store multiple data line sets in the Datatest.dat file and have only one of them active at a time.
When the program processes a manually entered time and when it reads data lines from Datatest.dat it checks the directories Filese (EM signals) and Filesq (earthquake lines) to see if a special file pertaining to that time or data line has been stored there. If so it loads that file into memory. If new earthquake data have been stored in Dataeqem.dat since that special file was created it processes the new earthquake data, adds it to the special file in its memory, and then updates the file stored in the appropriate directory. That entire process usually takes just a few seconds.
Whenever a new time is entered manually or when the program encounters a data line in Datatest.dat that it has not processed before it creates that special file for that time or line and stores it in the Filese directory if it is an EM signal time, and in the Filesq directory if it is an earthquake time. Depending on the computer’s processor speed, it can take between 20 seconds and several minutes to create one of those files.
Datatest.dat FILE TOP LINE CODES FOR DIFFERENT TESTS
C = Individual Tests
Q = Averaged Tests
# (Number) = Tests On Groups Of Averaged Signals (this mode is presently deactivated)
The program reads the top line in the file to get information on the type of test it needs to run, C, Q, or # (Number).
Additionally, in the first three character column of each EM signal data line there is a number between 0 and 9 that tells the program how important that data line is versus the other lines being tested. Lines with a 0 in the first column are ignored by the program. The program regards lines with a 9 in the first column as being nine times as important on a linear scale as lines that have a 1 in the first column.
C = Individual Tests
If the capital letter “C” is stored on the top line of Datatest.dat on the left side then when the program starts running it will process each data line between “start” and “end” as a separate entity. And if there are five data lines there, for example, when the graphics Chart and Map displays appear, there will be five separate line traces on the Chart display and five separate Maps.
The “C” test routine enables the program user to determine which earthquakes matched a given EM signal. And it enables the user to compare one earthquake with another to see if they might have been triggered by similar forces.
When “C” tests are being run with the Relative option active, Chart lines are normalized to have peaks that are as large as possible and still fit within the line boundaries. And the EM signal strength number in the first three character column of the line is ignored. If the Absolute option is active the line peaks will have different heights depending in part on the value of the number in that column.
Q = Averaged Tests
If the capital letter “Q” is stored on the top line of Datatest.dat on the left side then when the program starts running it will average all of the data lines between “start” and “end” together. And no matter how many data lines there are, there will be only one line trace on the graphics Chart and only one Map.
When a number of EM signals are detected during some period of time, they might all be associated with the same approaching earthquake. But if each signal is processed separately with the “C” test, so many earthquakes can appear on each signal related Map that it can be difficult to tell where all the signals are pointing. The “Q” test enables the program user to average together all of the data lines in Datatest.dat and perhaps determine which were the most likely locations that the signals were pointing.
The “Q” test takes into account the EM signal strength listed in the first three character column of an EM signal data line.
# (Number) = Tests On Groups Of Averaged Signals
This is the program's primary forecasting procedure. It is not active in the present version of the program because some changes are being made to the source code.
If a number is stored in the upper left corner of the Datatest.dat file then the program displays test results for groups of averaged signals.
This test makes it possible for the program user to observe changes over time regarding the locations where the EM signals are pointing. Large numbers of EM times are averaged together eliminating some of the variability of the signals.
The following example explains what the program would do if the number 3 were stored in the top left corner of Datatest.dat.
The program will start with the first data line after the word “start.” And it will begin averaging that data line and the following one until it has done that for all of the data lines in the three month period of time preceding the date of the first data line.
Next, it will move backwards in time ten days from that first data line following the word “start.” And it will begin averaging together all of the data lines going back three months in time from the date of that particular data line.
Finally, since three tests were requested, the program will move backwards in time an additional ten days from the date of the first data line following the word “start.” And it will begin averaging together all of the data lines in the three month period of time going backwards from that date.
The program now has three groups of averaged data lines offset from one another by ten days. And it processes and displays them as if they were three separate data lines.
9 is probably a good number to use for standard testing. The Datatest.dat program will process and display groups as if there are nine individual data lines. There will be nine lines on the Chart, and nine Maps. Each of the nine Chart lines would show changes that occurred during a three month period of time.
The # (Number) test takes into account the EM signal strength listed in the first three character column of an EM signal data line.
When this EM signal group averaging mode is used, after the program processes all of the individual data lines, it stores a file related to each group in the Filesf directory. Then the next time it is instructed to process those groups it will reload those files into memory instead of reprocessing all of the individual data lines. That can save a considerable amount of time.
Return
To HRPROJ Homepage
This first version of this Web page was
stored at this site on
June 7, 2010. Comments regarding this Web site are
welcome.
Please send them to: seismic@ix.netcom.com The information on
this Web
page represents expressions of personal opinion by
the Web page author. The
address -URL- for this Web page is:
http://www.hrproj.com/Etdprog-ReadMe.html